Quick Answer
MetaTrader 4 (MT4) is the world's most widely used retail forex trading platform in 2026, installed on tens of millions of devices globally. It provides real-time price charts, a full suite of built-in technical indicators, automated trading capability through Expert Advisors, and fast order execution for market, limit, and stop orders. Setting up MT4 correctly takes approximately 30 minutes and involves downloading the platform from your broker's website, configuring your chart workspace, adding the appropriate indicators for your trading strategy, and practicing order placement on a demo account before going live.
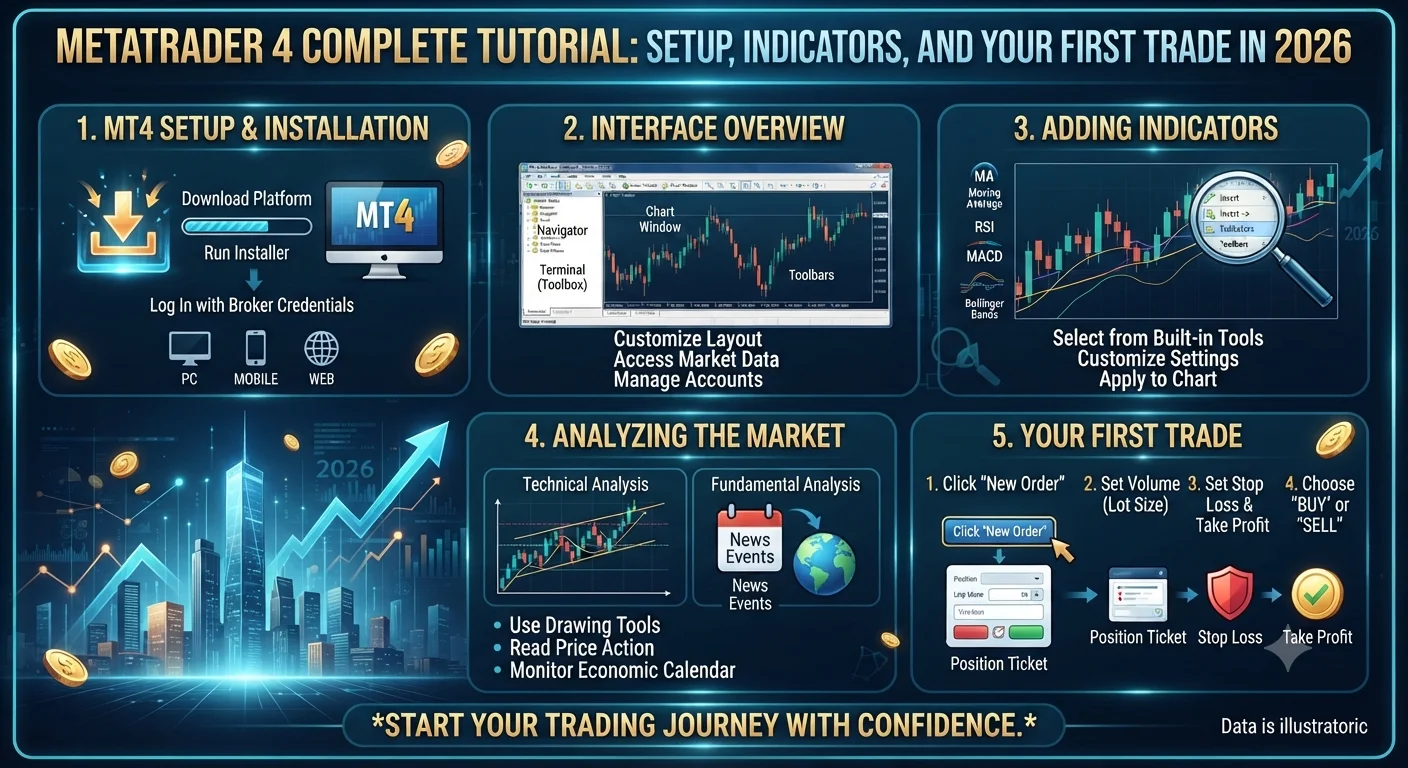
How to Download and Install MetaTrader 4 Step by Step
- Quick Answer
- How to Download and Install MetaTrader 4 Step by Step
- Understanding the MT4 Interface: Charts, Orders, and Terminal
- Adding and Configuring Technical Indicators on MT4
- Placing Market, Limit, and Stop Orders in MT4
- Customizing MT4 with Templates and Profiles for Faster Trading
- Key Takeaways on MetaTrader 4 in 2026
MetaTrader 4 is available as a free download through your broker's website. Every broker that supports MT4 hosts its own branded version of the platform that is pre-configured with the broker's server addresses, making the connection to live and demo accounts seamless. Do not download MT4 from third-party websites. Always download directly from your chosen broker's official website to ensure you receive the correct server configuration and avoid tampered software.
Step 1: Navigate to your broker's official website and locate the Platforms or Downloads section. In 2026, most regulated brokers including IC Markets, Pepperstone, XM, and AvaTrade host a dedicated page for MT4 and MT5 downloads with clear download buttons for Windows, Mac (via Wine or native companion apps), iOS, and Android.
Step 2: Download the Windows installer (.exe file). The installer is typically between 8 and 15 MB. Once downloaded, run the installer and follow the on-screen prompts. The installation completes in under two minutes on a standard computer and places the MT4 application in your Programs folder and on your desktop.
Step 3: Launch MT4 for the first time. On the first launch, MT4 automatically opens a new account dialog. Select your broker from the dropdown list or enter your broker's server address manually if prompted. Choose demo account to begin practice trading without risking real money.
Step 4: Log in with your credentials. Your broker emails your demo account number, password, and server name when you register for a demo. Enter these in the login dialog. MT4 connects to the broker's server and begins populating with live price data within seconds.
Step 5: For mobile trading, download the MetaTrader 4 application from the Apple App Store or Google Play Store. Log in using the same account credentials as your desktop platform. The mobile interface is simplified relative to desktop but provides full order placement, price monitoring, and basic charting capability for managing trades on the go.
Understanding the MT4 Interface: Charts, Orders, and Terminal
The MT4 interface is divided into several functional areas that work together to provide a complete trading environment.
The Market Watch panel appears on the left side of the screen by default and displays the live bid and ask prices for all currency pairs and instruments available through your broker. You can right-click any instrument to add it to a chart, hide instruments you do not trade, or view the full specification of any pair including contract size, pip value, and swap rates.
The Navigator panel sits below the Market Watch and contains four expandable sections: Accounts (showing your logged-in accounts), Indicators (the full library of MT4's built-in and custom indicators), Expert Advisors (automated trading robots), and Scripts (one-click automation tools). To add an indicator to a chart, simply double-click it in the Navigator or drag and drop it onto the desired chart.
The Chart area occupies the main workspace and can display multiple charts simultaneously as separate windows or tabs. Each chart shows price movement for one instrument on one timeframe. Right-clicking the chart area reveals options to add indicators, change the chart type (candlestick, bar, or line), switch timeframes, or access the chart properties for visual customization.
- How to Choose a Forex Broker in 2026: Regulation, Spreads, and Platforms Compared
- Major, Minor, and Exotic Currency Pairs Explained: Which Should You Trade in 2026?
- What Is Forex Trading? A Complete Beginners Guide to the $7.5 Trillion Daily Market
The Terminal panel at the bottom of the screen has multiple tabs. The Trade tab shows all open positions with real-time profit and loss. The History tab shows closed trades. The News tab displays market news from MetaQuotes. The Alerts tab allows you to create price alerts that notify you when a pair reaches a specified level. The Mailbox tab receives system messages from your broker.
The toolbar at the top provides quick access to the most frequently used functions: new chart, zoom in and out, crosshair tool, zoom to fit all data, period separator, and the timeframe buttons (M1, M5, M15, M30, H1, H4, D1, W1, MN) that switch the displayed chart period with one click.
Adding and Configuring Technical Indicators on MT4
MT4 comes pre-installed with 30 built-in indicators organized into four categories in the Navigator panel: Trend indicators (including Moving Averages and Bollinger Bands), Oscillators (including RSI, MACD, Stochastic, and CCI), Volumes indicators (including the On-Balance Volume and Volumes indicator), and Bill Williams indicators (including the Alligator and Fractals).
Adding the Exponential Moving Average (EMA): In the Navigator panel, expand the Indicators folder and then the Trend subfolder. Double-click Moving Average. In the configuration dialog that appears, set the Period to 21 for the first EMA. Set the MA Method to Exponential. Set Apply To to Close. Choose a color for the line (blue is conventional for the 21 EMA). Click OK. The EMA appears on your chart immediately. Repeat the process with a Period of 50 and a different color (red is conventional for the 50 EMA) to add the second EMA.
Adding the RSI: In the Navigator, expand Oscillators. Double-click Relative Strength Index. Set the Period to 14 for standard swing trading use or 7 for scalping use. Set Apply To to Close. The RSI appears in a separate panel below the price chart. Right-click the RSI panel and select Properties to adjust the overbought (70) and oversold (30) levels or to change colors.
Recommended Articles
 FOREX TRADING
 FOREX TRADING
 FOREX TRADING
Adding the MACD: In the Navigator, expand Oscillators. Double-click MACD. The default settings of 12, 26, and 9 are pre-filled. Click OK. The MACD histogram and signal line appear in a new panel below the chart. In 2026, many traders prefer to display the MACD with a colored histogram (green for positive, red for negative) by right-clicking the MACD panel and adjusting the histogram color settings in the Properties dialog.
Custom indicators: Beyond the 30 built-in indicators, the MQL4 community has developed thousands of free and paid custom indicators available through the MetaTrader Market (accessible from within MT4 under the Tools menu) and from community websites such as mql5.com. Popular custom indicators in 2026 include advanced volume profile tools, session highlighters that mark the London, New York, and Asian session boundaries on the chart, and automatic support and resistance level finders. To install a downloaded custom indicator, place the .ex4 or .mq4 file in the MT4 Indicators folder (accessible via File menu, Open Data Folder, MQL4, Indicators) and restart MT4.
Placing Market, Limit, and Stop Orders in MT4
MT4 supports four primary order types that cover all standard trading scenarios. Understanding each type before placing live trades is essential because selecting the wrong order type can result in unintended entries.
Market Order: A market order executes immediately at the current best available price. It is the fastest execution method and is appropriate when you want to enter a trade right now at whatever the current price is. To place a market order in MT4, press F9 or double-click the instrument in the Market Watch panel. The Order window opens showing the current bid and ask. Set your lot size, add a stop loss and take profit (recommended on every trade), and click the Buy or Sell button. The order executes immediately.
Limit Order: A limit order is a pending order that executes only when price reaches a specified level that is more favorable than the current market price. A Buy Limit is placed below the current price (you want to buy if price dips to a lower level). A Sell Limit is placed above the current price (you want to sell if price rises to a higher level). Limit orders are the primary tool for Fibonacci retracement entries and support zone bounce strategies, where you identify in advance the price at which you want to enter and let the market come to you.
To place a limit order in MT4, open the Order window (F9), change the Order Type dropdown from Market Execution to Pending Order, then select Buy Limit or Sell Limit. Enter your desired entry price, stop loss, and take profit, then click Place. The order appears in the Terminal panel's Trade tab with a yellow background indicating it is pending.
Stop Order: A stop order executes when price reaches a specified level that is less favorable than the current market price, triggering execution in the direction of the break. A Buy Stop is placed above the current price (you want to buy if price rises to a specified level, anticipating continuation higher). A Sell Stop is placed below the current price. Stop orders are the primary tool for breakout trading strategies.
Trailing Stop: A trailing stop is a dynamic stop loss that automatically moves in the direction of a profitable trade at a specified pip distance. If you are long EUR/USD with a 30-pip trailing stop and price moves 50 pips in your favor, the trailing stop has moved 50 pips higher and now protects 20 pips of profit. If price then reverses 30 pips, the trailing stop triggers and closes the trade at a 20-pip profit. To add a trailing stop in MT4, right-click an open position in the Terminal's Trade tab and select Trailing Stop, then choose your desired distance in pips.
Customizing MT4 with Templates and Profiles for Faster Trading
Once you have configured your preferred chart setup with indicators, colors, and timeframes, saving it as a template allows you to apply the exact same configuration to any new chart with two clicks rather than rebuilding it from scratch.
Creating a template: With your preferred chart open and all indicators configured, right-click the chart area and select Template, then Save Template. Give the template a descriptive name such as SwingTradingSetup or ScalpingM1. The template is saved and available for application to any chart.
Applying a template: Open a new chart by double-clicking any instrument in the Market Watch or by selecting File, New Chart. Right-click the new chart and select Template, then choose your saved template from the list. The entire indicator configuration, colors, and settings are applied instantly.
Profiles save the entire MT4 workspace including all open chart windows, their positions on screen, and their individual templates as a single named configuration. If you regularly switch between a scalping setup with EUR/USD on the M1 and M5 charts and a swing trading setup with EUR/USD and GBP/USD on the H4 chart, saving each as a separate profile allows you to switch between them instantly. Access profiles through the File menu and select Profiles, then Save As, or Load to switch to a previously saved workspace.
In 2026, many professional traders maintain separate profiles for each trading session: a London session profile with the high-volatility pairs most active during that window, and a New York session profile optimized for USD-heavy pairs. This workflow eliminates the time spent adjusting charts at the start of each session and keeps the trading environment consistently organized.
Key Takeaways on MetaTrader 4 in 2026
MetaTrader 4 remains the industry standard retail trading platform in 2026 despite its age, due to its stability, massive indicator library, and universal broker support. Correct initial setup of the chart workspace, indicator configuration, and order types reduces friction in real-time trading decisions and allows focus to remain on the market rather than the mechanics of the platform. Saving templates and profiles converts a well-configured workspace from a one-time achievement into a permanent, instantly reproducible trading environment. Practice placing all four order types on a demo account until the process is completely automatic before opening a live account.